


From KizClub; direct link for the “Dear Zoo” flannelboard.
I know that this book has been around since I was a kid, but I had never seen it until I found the flannel template for it. It was a super cute template, so I inter-library loaned the book to see the story. I was immediately sold on making this one!
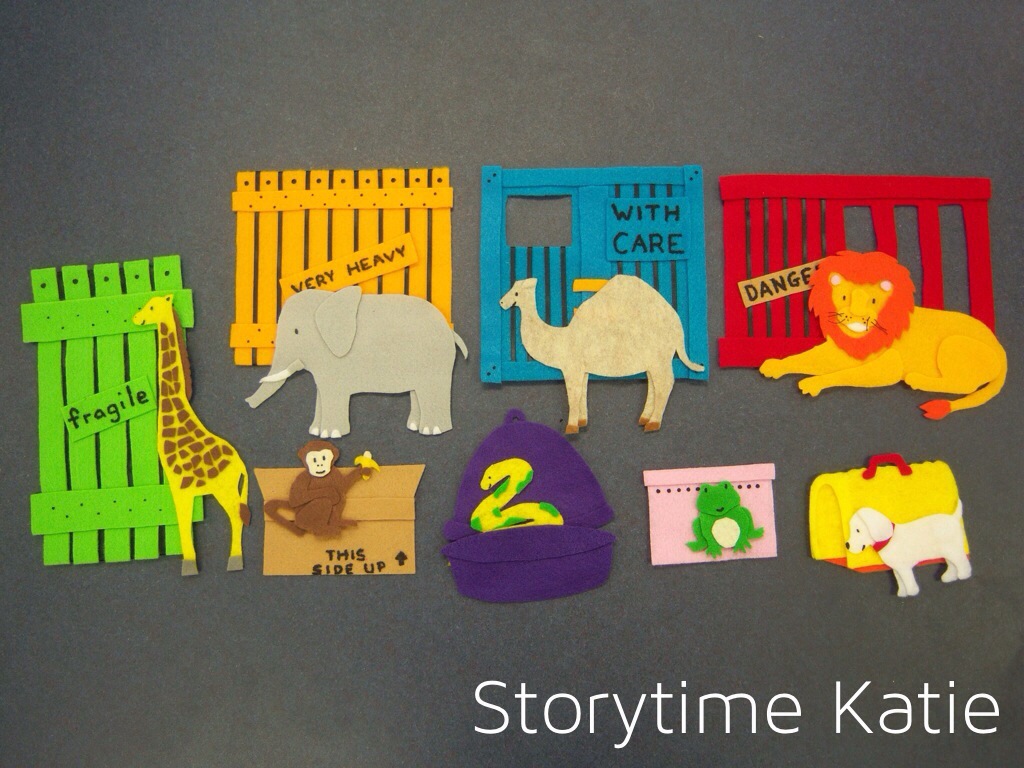
Since I’ve been making flannelboards for about a year now, I’ve been looking for ways to up my ante, for lack of a better term. So while making this flannel, I experimented with ribbon, sewing, and paint pens.

For the ribbon, I just cut for the length of the piece to make a box stripe and overlapped the ribbon onto the back, gluing it down. The ribbon kept popping up, unless I held the piece down for a couple of minutes — which was difficult to do on desk. So I wound up gluing a backing piece of felt over the ribbon, which will probably preserve the flannel for longer anyways.
(I also tried a different way of doing this — gluing the ribbon down on a base color, and then layering the felt over it. While I kept the piece I did this on — the giraffe house, you can see it in the second to last picture — I decided I much preferred the look of the ribbon directly on the felt.)

As for the paint pens, my normal painting technique (paper clip & tempera paint) did not go over well when I tried to write with it. I just didn’t have the control I wanted. So I found these paint pens at Jo-Ann Fabrics, and thought I’d give it a go.
Still got to poke the felt instead of dragging it along, and I found I needed to dot out the letters so that I kept them consistent as I worked. I also dabbed at a piece of paper between each dot to keep the paint going steadily.

The finished piece (with ribbon and lettering), compared to the book. (And yes, I have the pop-up edition!)
Next up, sewing!
I had to do the whiskers on the lion — it would have looked funny without them. So I tied some knots behind the felt, and pulled it through. Absolutely the most basic sewing ever.
(Although, I doubt it will take me long to try out some other sewing techniques…)

After pulling all six whiskers through (and thoroughly gluing them behind the felt), I just trimmed them so that they would be even.

Just some pictures of the final project below. Enjoy!


I can’t believe you make all of these flannel boards! You should go into business!!
That’s what Donna keeps saying. I told her as soon as she starts the craft blog we keep begging her to, then I’d look into it.
You are my new felt board idol. This is amazing!
Thank you! You’re so sweet!
These are amazing, you should sell them on ebay! i would definatly buy a set!
I agree. I would totally pay good money for this flannel for the time I would save and skill it takes to make it. Let me know if you ever decide to sell one. 🙂 Great Job!
I’d be willing to purchase too! I use a felt board to teach my sign language classes! And I love that these are true felt layers. Not something just printed (I would never waste my money on something I can print on milk filters at home).
I’m still not planning on selling at this time, but thanks for your kind words.
Great ideas and work thank you
Thank you!
Wow, this looks great! I consider it a win when my flannels are at least recognizable when finished. This is amazing!
These are stellar!!
Thank you so much!
i think your flannels are amazing! What kind of seizors do you use to make such a clean cut?
I use really old kid scissors that I found at my library. You can see a picture of them here: https://storytimekatie.com/2011/10/07/flannel-friday-flannelboard-kit/
Hi!! My name is Patricia and I am a English Teacher in Brazil. Thank you so much to help me to retelling this beautiful story. I am making a storytelling apron with your patterns. God blass you!